

How To Use Background Eraser

The Background Eraser Tool In Photoshop
In this tutorial, we'll learn all nearly the Background Eraser Tool in Photoshop and how to use information technology to easily remove background areas of an epitome.
The Background Eraser Tool is especially useful with photos that comprise lots of fine detail along the edges betwixt your subject and its groundwork, like, for example, if you want to erase the heaven in an paradigm without erasing the copse below it.
But don't let the proper noun fool you. The Groundwork Eraser really has goose egg to do with erasing backgrounds, since Photoshop has no style of knowing what's considered the background in a photograph and what isn't. It can but every bit easily be used to erase whatsoever part of an image, and that'southward because the Background Eraser is really a color eraser. It samples colors every bit y'all elevate the tool over them and erases but those colors, leaving all other colors untouched. So if your heaven is blueish and your trees are green, the Background Eraser can easily erase the blue sky while leaving the dark-green trees lonely, at least until someone comes along and cuts them down, which gives us all the more than reason to protect them in the image.
This version of our Groundwork Eraser tutorial has been updated for Photoshop CS6 and is besides fully compatible with Photoshop CC (Creative Cloud). If you're using Photoshop CS5 or earlier, y'all tin can all the same follow along here, or you can check out the original Background Eraser tutorial.
The Groundwork Eraser is, without a doubtfulness, one of the best tools in Photoshop for removing unwanted areas of a photo, but it'south not perfect and it does take 1 serious drawback. As an eraser tool, it physically deletes pixels from the image, which ways that once they're gone, they're gone for adept. To avoid damaging your original image, it's a good thought to duplicate your Background layer first before erasing any pixels, or piece of work on a split up copy of your paradigm.
How To Remove Backgrounds With Photoshop
Selecting The Background Eraser Tool
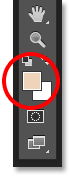
By default, the Groundwork Eraser is hiding behind Photoshop's regular Eraser Tool in the Tools panel. To select it, correct-click (Win) / Control-click (Mac) on the Eraser Tool, and then cull the Background Eraser Tool from the fly-out menu that appears:
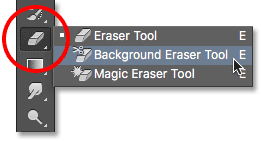
The Background Eraser Tool is found nested under the regular Eraser Tool in the Tools panel.
With the Background Eraser selected, your mouse cursor will change into a circle with a small crosshair in the center of information technology:
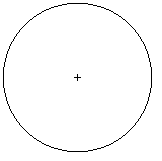
The Background Eraser'south cursor is made up of a unproblematic circle with a crosshair in the middle.
Adjusting The Size Of The Brush
The Background Eraser Tool is really a brush, and just like Photoshop'due south other Brush tools, you lot tin adapt its size straight from your keyboard. Press the left subclass primal ( [ ) repeatedly to get in smaller or the right bracket key ( ] ) to make it larger. You can also arrange the hardness of the edges by calculation the Shift key. Printing Shift+left bracket ( [ ) repeatedly to make the edges softer or Shift+right bracket ( ] ) to make them harder. In general, you'll desire to use difficult edges with the Background Eraser since soft edges tin exit many background artifacts behind.
How The Background Eraser Works
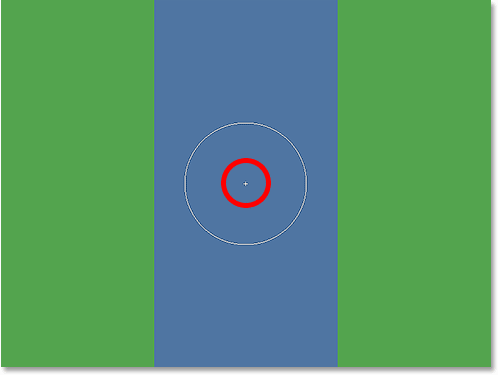
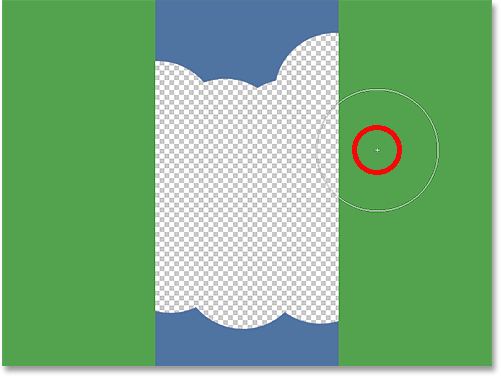
Before we look at a real-world case of Photoshop's Background Eraser Tool in activity, let'southward learn the basics of how it works. Here's a unproblematic image fabricated up of aught more than than a few blue and dark-green vertical columns:
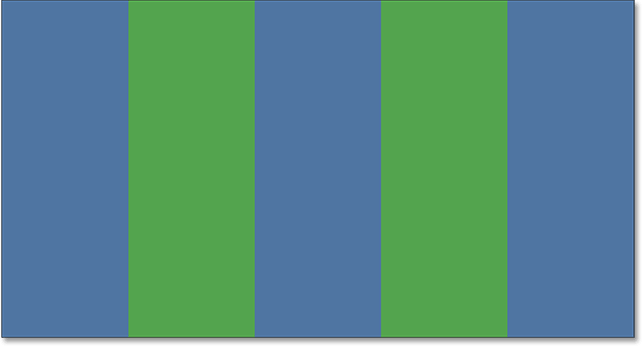
Some other masterpiece created in Photoshop.
If nosotros wait in my Layers panel, nosotros meet that the prototype is sitting on the Background layer:
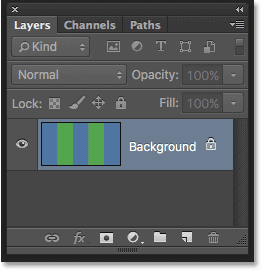
The Layers panel.
Permit's say I desire to erase the blue column in the center without erasing the green columns on either side of it. The way the Background Eraser works (by default, anyway) is that Photoshop samples the color that's straight underneath the crosshair in the center of the circle. The larger circle surrounding the crosshair represents the surface area where Photoshop will erase pixels. Whatever pixels inside the circle that match the color of the pixel direct under the crosshair will exist erased.
To erase the blue centre column, I'll move the cursor into the blue area, making sure that the crosshair in the heart is directly over the bluish color I desire to erase:
Positioning the crosshair over an surface area of bluish.
When I click my mouse button, Photoshop samples the blue color nether the crosshair and erases all of the matching blue pixels that autumn within the larger circle:
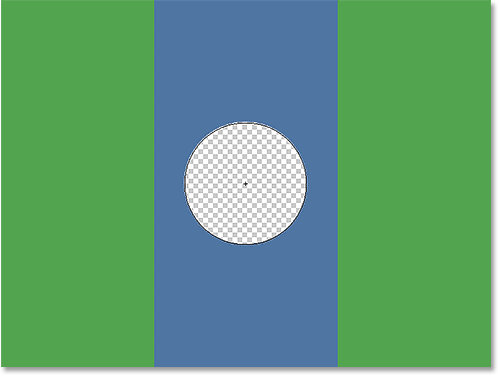
Only the pixels within the circle are deleted.
To erase more of the bluish cavalcade, I just demand to keep holding my mouse button down as I drag the Groundwork Eraser over more of the expanse. Notice that even though the circumvolve sometimes extends into one of the dark-green columns, they remain untouched, and that'due south considering those pixels are not the same color every bit the colour that Photoshop sampled. This makes information technology piece of cake to get right up along the edges of the surface area I desire to erase. Every bit long as I keep the crosshair inside the blue surface area, Photoshop will only erase blue pixels:
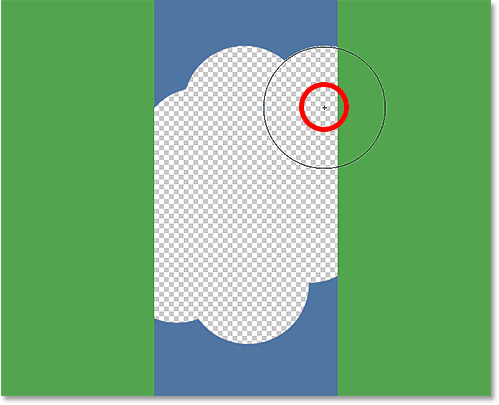
Yous can move the cursor into other colors in the prototype without erasing them as long as y'all continue the crosshair away from them.
All the same, if I accidentally motion the crosshair over an area of light-green, Photoshop samples the green color and starts erasing green pixels:
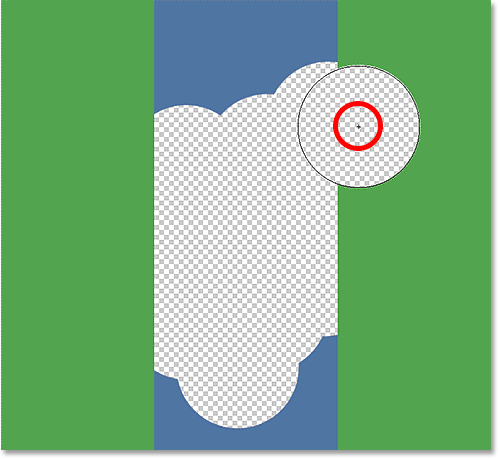
Moving the crosshair over a new color causes Photoshop to change the color information technology'southward erasing.
If you lot make a mistake like this, simply press Ctrl+Z (Win) / Control+Z (Mac) on your keyboard to disengage it. If you need to undo multiple steps, printing Ctrl+Alt+Z (Win) / Control+Pick+Z (Mac) repeatedly.
A Quick Note Near The Groundwork Layer
Observe the checkerboard pattern that appears in place of the areas I've erased. That'southward Photoshop'southward style of representing transparency on a layer, which, if you're familiar with Photoshop, may take y'all wondering what's going on hither. A moment ago, nosotros saw that my image was sitting on the Background layer. Photoshop treats Background layers differently from normal layers, with dissimilar rules for what we can and can't do with them.
I of the things we can't do is erase pixels on them, since transparency is not allowed on a Background layer (after all, it's the background, and not being able to see through it is function of what makes information technology a groundwork). How, then, did I manage to erase the pixels? Is at that place some sort of "Extra Strength" setting for the Background Eraser that nosotros oasis't looked at all the same?
Nope. What happened is that Photoshop assumed I knew what I doing (not e'er the best assumption to brand) and, rather than tossing up an error message complaining that I can't delete pixels on a Background layer, information technology automatically converted the Background layer into a regular layer, which information technology named "Layer 0". This isn't anything terribly important, or even remotely interesting, simply it's even so expert to know what's going on:
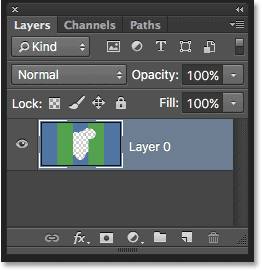
When using the Background Eraser on the Background layer, Photoshop converts information technology to a normal layer for us.
Let'south have what nosotros've learned so far and look at a real-globe case of the Groundwork Eraser Tool in action. As I make my manner around the tree in this photo, the Background Eraser has little trouble erasing the blueish sky while leaving the tree itself untouched, every bit long as I keep the crosshair over the sky and abroad from the tree:
Fifty-fifty though the Background Eraser's cursor extends into the tree, but the blueish sky is erased.
However, if I sideslip and move the crosshair over one of the leaves, then Photoshop samples the new color and starts erasing the tree, in which example I'd need to press Ctrl+Z (Win) / Command+Z (Mac) on my keyboard to undo the last footstep and try again:
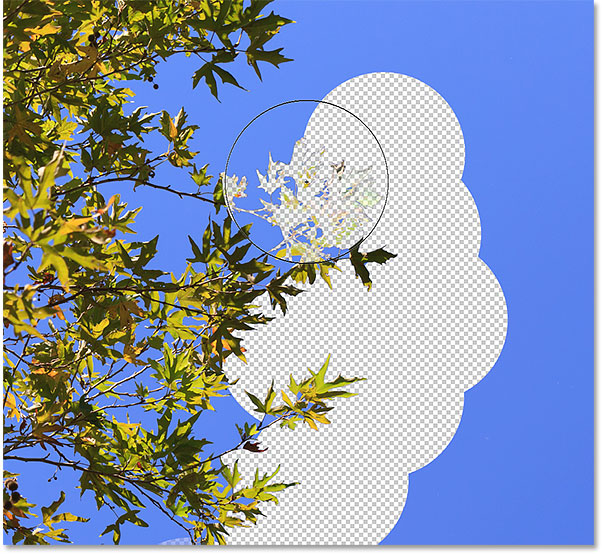
Photoshop has no idea what the heaven or a tree is. It cares only about the color under the crosshair.
And so far, nosotros know that Photoshop samples the color directly nether the crosshair in the center of the Background Eraser'southward cursor, and that it erases any pixels of the aforementioned colour that fall within the larger circle. Nosotros also know that if we motility the crosshair over a different color equally we're dragging the Background Eraser effectually, Photoshop will sample the new color and apply it as the color it should be erasing.
What we've but described here is the default behavior of the Groundwork Eraser Tool, but it's not the only way the tool can behave. So how do we alter things? Nosotros do that using the settings found in the Options Bar. Let's check them out.
Sampling Options
Whenever we accept the Background Eraser Tool selected, the Options Bar forth the top of the screen displays various options for controlling how the tool behaves. One of the near important behaviors nosotros can modify is how Photoshop samples colors under the crosshair, or if it samples them at all.
Over on the left of the Options Bar, yous'll find a set of three icons. These are the Sampling Options, and each icon selects a different behavior. From left to right, nosotros take Continuous, Once and Background Swatch:

The sampling options: Continuous (left), In one case (middle) and Background Swatch (right).
Of the three, the two y'all'll switch between the most are Continuous (the icon on the left) and One time (the middle icon). Continuous is selected by default, and it means that as we motility the Background Eraser around, Photoshop continuously samples the color nether the crosshair. That'due south why, when I accidentally moved the crosshair over the greenish column or the greenish tree, Photoshop started erasing green pixels even though I was initially erasing blue pixels.
The Continuous sampling option works great when the groundwork you're trying to erase contains multiple colors. But if the color of your background doesn't change much, the In one case selection usually works better. I'll select it past clicking on the middle icon:

Selecting the Once sampling option in the Options Bar.
Equally you may have guessed from its proper noun, Once tells Photoshop to sample the color nether the crosshair in one case and that's it. Whichever color is under the crosshair the moment you click your mouse push is the color that Photoshop will erase no matter how many other colors you drag the crosshair over (as long as you keep your mouse button held downward). Sentry what happens now when I "accidentally" move the crosshair over the green column. The Background Eraser has no effect on it this time because the crosshair was over the blue column when I clicked and held downwards my mouse button:
Photoshop no longer erases the greenish cavalcade even though the crosshair has moved over the green color.
We see the same thing happening in our photo. With One time selected as the sampling option, Photoshop is able to ignore the leaves this time even though I've moved the crosshair over them, and that's because I initially clicked on the blue sky:
With Once selected, the but color Photoshop will erase is the ane that was sampled initially.
If you're having trouble positioning the crosshair over the color you want to erase, attempt the Background Swatch sampling option (the icon on the right):

Selecting the Background Swatch sampling choice.
With Background Swatch selected, click on the Background color swatch in the Tools console and choose a colour from the Color Picker that matches (as close as possible, anyway) the color in your paradigm that you want to erase. If the color yous've selected isn't quite right, adjust the Tolerance value in the Options Bar (which nosotros'll wait at in a moment) until you're able to erase the pixels:

With the Background Swatch sampling option selected, cull a Background color similar to the colour you lot need to erase.
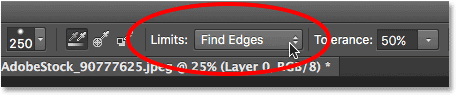
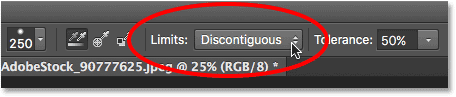
Limits
Another important choice for the Background Eraser is Limits. One time Photoshop knows which color yous want to erase, Limits tells it where it can look for pixels that match that colour so it can erase them. The iii options for Limits are Contiguous, Discontiguous and Find Edges:

The Limits option.
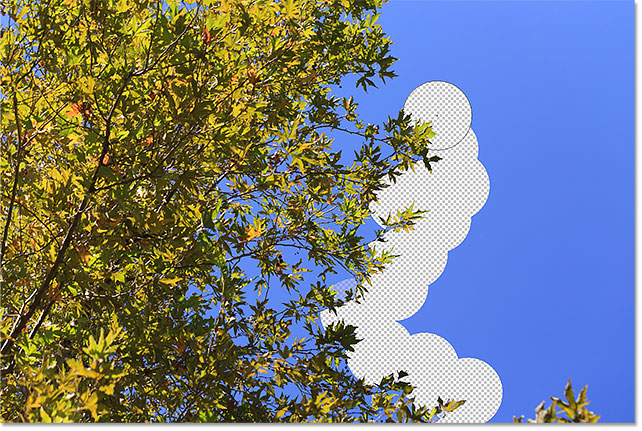
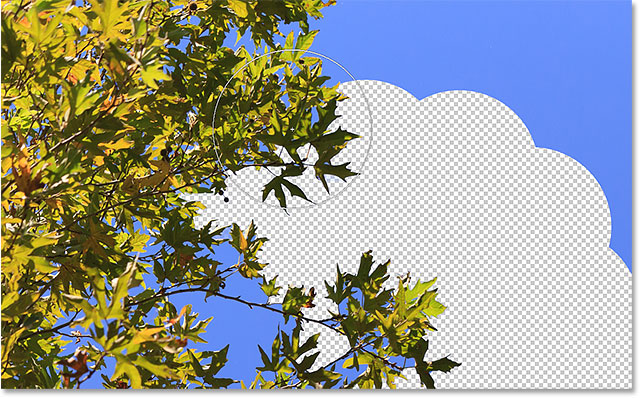
Contiguous, the default setting, means that Photoshop can merely erase pixels in areas that are physically touching the pixel nether the crosshair. In other words, information technology tin't jump across tree branches, fence posts, or anything else in the photo that separates one area of pixels from another. Hither nosotros come across that while the Background Eraser has no trouble erasing the sky around the exterior of the tree, the Contiguous option is preventing it from deleting the isolated blue areas betwixt the leaves and branches. We'll see how to get around this problem in a moment:
The branches on the tree act as road blocks for the Background Eraser as it tries to delete the blue sky pixels.
If yous discover that Photoshop is having problem maintaining the sharpness of the edges around the subject you're trying to go on (in other words, some of the edge is fading away), attempt undoing your steps and and so switching the Limits option to Find Edges:
Changing the Limits choice to Observe Edges.
Find Edges is similar to Contiguous in that it can just delete pixels that are physically touching the pixel nether the crosshair, so it won't help me access those areas of blue sky that are trapped between the leaves and branches. However, Find Edges is more precise than Face-to-face and better at maintaining precipitous edge detail. Once more, I don't really need to utilise it here with these leaves, but if I was deleting the sky along the border of a building, for instance, where maintaining the precipitous edges of the building would exist important, then Find Edges would exist a great pick:
Find Edges is more precise, but can also exist a bit slower to piece of work with than Face-to-face.
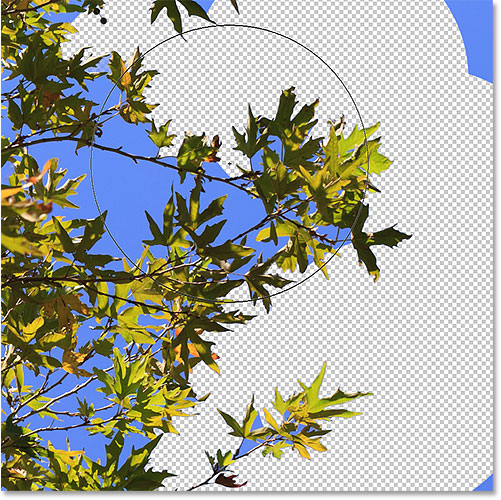
So, what about those isolated areas of blue heaven in my image that I can't get to with either Face-to-face or Notice Edges? That's what the third Limits selection, Discontiguous, is for:
Selecting Discontiguous for the Limits option in the Options Bar.
Discontiguous means that Photoshop is free to erase whatsoever pixels anywhere in the image that lucifer our sampled color, whether they're touching the crosshair or not. As long as the pixels fall within the larger circle surrounding the crosshair, they're fair game. In my example, it means that in one case I've clicked the crosshair on an area of blue sky, I can just elevate the Background Eraser around inside the tree to easily erase any areas of sky showing through it. I also have my sampling option gear up to One time so Photoshop doesn't modify the color being erased equally I motion over the tree:

With Limits set to Discontiguous, erasing the blue sky through the tree is as easy equally dragging the Background Eraser around.
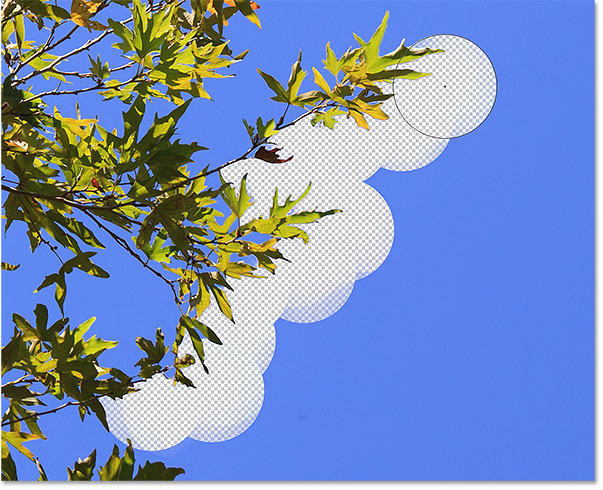
Unfortunately, if we await closely, we tin can run into some darker blue areas of the sky remaining around the leaves and branches. I've added a black background behind the epitome to get in easier to see. Fifty-fifty with the Limits option fix to Discontiguous, the Background Eraser withal needs a piddling more help with this epitome. This brings us to the third important option for the Background Eraser, and one that can make all the difference when it comes to using the tool successfully - Tolerance. We'll look at it side by side:
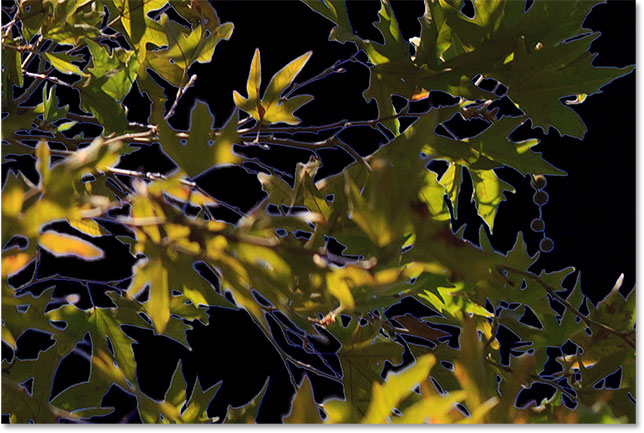
Some blue fringing withal remains.
Tolerance
The third of the three major options for the Background Eraser is Tolerance, which determines how unlike a pixel'southward color can exist from the sampled colour for Photoshop to erase it. You'll find the Tolerance pick directly to the right of the Limits option in the Options Bar:

Use Tolerance to control how similar a pixel colour needs to exist to the sampled color for it to be erased.
The default Tolerance value is 50% and that's commonly a skilful place to showtime. Merely if the colour of your groundwork is too similar to your subject, causing part of your subject to be erased, attempt a lower Tolerance setting. If, on the other manus, you notice background color fringing around the edges, as I do hither, try a higher Tolerance value.
I'1000 going to undo my previous steps with the Background Eraser and so I can try again, and since my sky is quite a bit different in colour from the tree, I'll increment my Tolerance value to 70%. I'll click to sample an area of bluish sky with the crosshair, and this fourth dimension, with the higher Tolerance setting, the Groundwork Eraser is able to do a much better job with cleaner results:
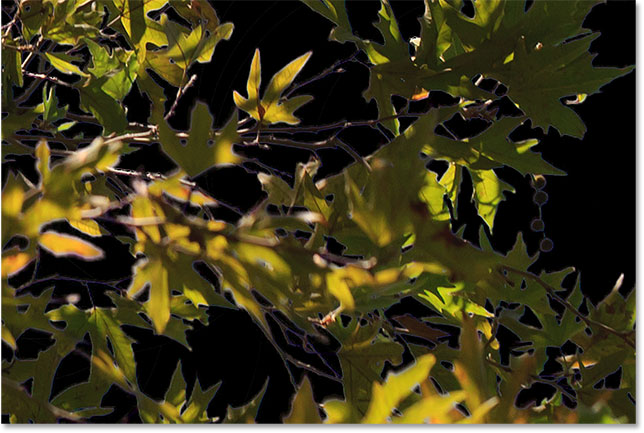
With a higher Tolerance setting, the Background Eraser was able to avoid the blue fringing along the edges.
Protect Foreground Color
Finally, if yous find that no affair what Tolerance setting you try, yous but can't seem to go the Background Eraser to erase the groundwork in your paradigm without taking office of your subject area along with it, effort the Protect Foreground Colour option. By default, information technology'south turned off:

The Protect Foreground Color choice in the Options Bar, currently deselected.
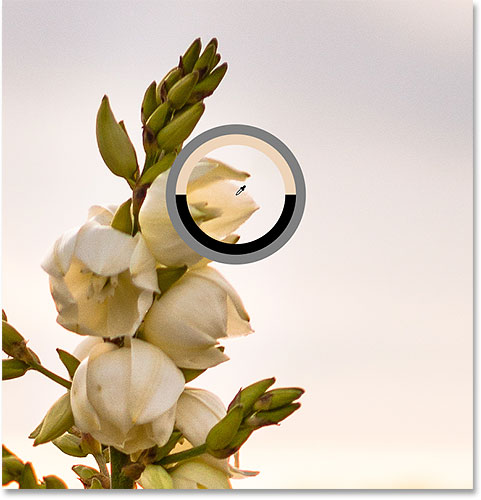
Protect Foreground Color allows usa to sample a color from the image to set as our new Foreground color. Photoshop volition then protect this color, preventing it from being erased (hence the proper name "Protect Foreground Color"). In this photo, the flowers are besides similar to the background, causing the Background Eraser to erase part of the flowers along with the sky:
Photoshop has a tough time finding the edges when the subject and groundwork are also similar.
To overcome this problem, I'll first undo my last step by pressing Ctrl+Z (Win) / Command+Z (Mac). Then, I'll select the Protect Foreground Color selection by clicking inside its checkbox:

Turning Protect Foreground Colour on.
To sample a color from the image, I'll press and hold the Alt (Win) / Option (Mac) primal on my keyboard, which temporarily switches me to the Eyedropper Tool, then I'll click on one of the flowers to sample that color. This will go the color that Photoshop protects:
Hold down Alt (Win) / Choice (Mac) and click on a color to protect.
If you look at your Foreground color swatch near the bottom of the Tools panel, y'all'll encounter that the color you lot sampled has become your new Foreground colour:
The sampled color appears in the Foreground color swatch.
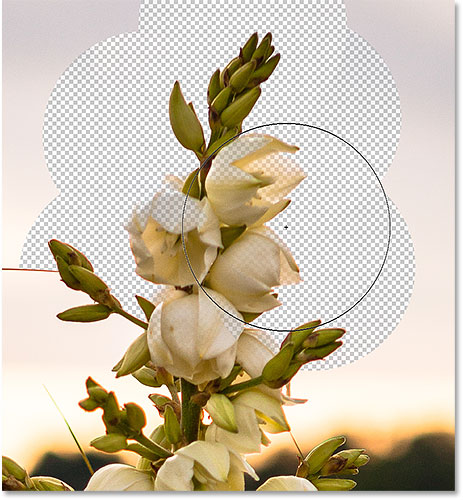
With that color now protected, I'll once again drag around the flowers with the Background Eraser to remove the sky, and this time, things piece of work out much ameliorate. Photoshop is able to erase the sky and leave the flowers intact. Just remember to deselect the Protect Foreground Colour option when y'all're done, otherwise the next time yous go to use the Background Eraser, you could get unexpected results:
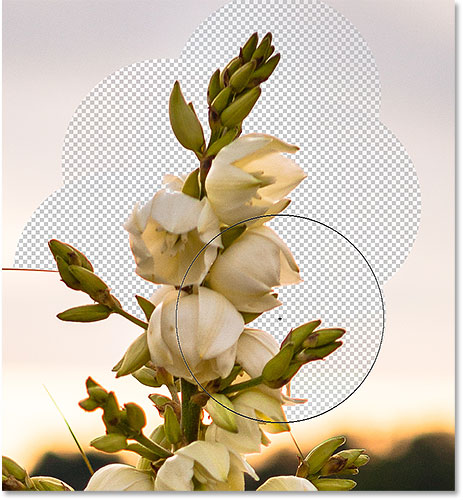
The background goes, the flowers become to stay.
Photoshop Background Eraser Tool - Quick Summary
We covered a lot in this tutorial. Here's a summary of what we've learned:
- Photoshop'south Background Eraser Tool tin can be used to easily remove unwanted areas of an image.
- To select the Background Eraser Tool, right-click (Win) / Control-click (Mac) on the standard Eraser Tool in the Tools console, then select the Groundwork Eraser Tool from the menu.
- To erase part of the epitome, position the crosshair in the center of the brush cursor over the color you want to erase, so click to sample the color. Go on your mouse button held down and drag the cursor over the paradigm. Whatsoever pixels the cursor passes over that friction match the sampled colour volition be erased.
- Pixels that do non match the sampled color will exist ignored.
- The Sampling Options in the Options Bar control the behavior of the Groundwork Eraser Tool.
- Continuous (default) tells Photoshop to continuously sample the color under the crosshair as you elevate the cursor.
- One time samples only the initial color you click on. No other colors will exist sampled while your mouse button is held down, even if you pass the crosshair over dissimilar colors.
- Background swatch volition erase pixels that friction match your electric current Background colour.
- The Limits option in the Options Bar determines where Photoshop tin can look for pixels to erase.
- Face-to-face (default) means that Photoshop can only erase pixels in areas that are physically touching the pixel under the crosshair. It will ignore pixels that match the sampled color but are separated past an area of a unlike color.
- Discontiguous volition erase any pixels that lucifer the sampled color that the crosshair passes over, even if they are separated by an expanse of a unlike color.
- Find Edges is similar to Contiguous but more precise and meliorate at maintaining sharp edge detail.
- Tolerance determines how different a pixel's colour can be from the sampled color for Photoshop to erase information technology. Utilize a lower Tolerance value when your subject and background colors are more similar. Higher Tolerance values can help remove edge fringing when your subject and background colors are more different.
- Protect Foreground Color prevents your current Foreground color from being erased. Press and hold Alt (Win) / Pick (Mac) and click on your subject field to sample a color and set it as your new Foreground colour.
- If y'all make a mistake with the Background Eraser Tool, printing Ctrl+Z (Win) / Command+Z (Mac) to undo your concluding brush stroke, then attempt once more.
And there nosotros have it! That's how to hands erase groundwork areas of an image using the Background Eraser Tool in Photoshop! Check out our Photo Retouching department for more image editing tutorials!
Other Stuff
© 2022 Photoshop Essentials.com.
For inspiration, not duplication.
Site design by Steve Patterson.
Photoshop is a trademark of Adobe Systems Inc.

How To Use Background Eraser,
Source: https://www.photoshopessentials.com/photo-editing/background-eraser/
Posted by: mitchellmovence.blogspot.com
0 Response to "How To Use Background Eraser"
Post a Comment